Low Calorie Ideas.com Newsletter

Low Calorie Ideas.com Newsletter

Link to Low Calorie Ideas

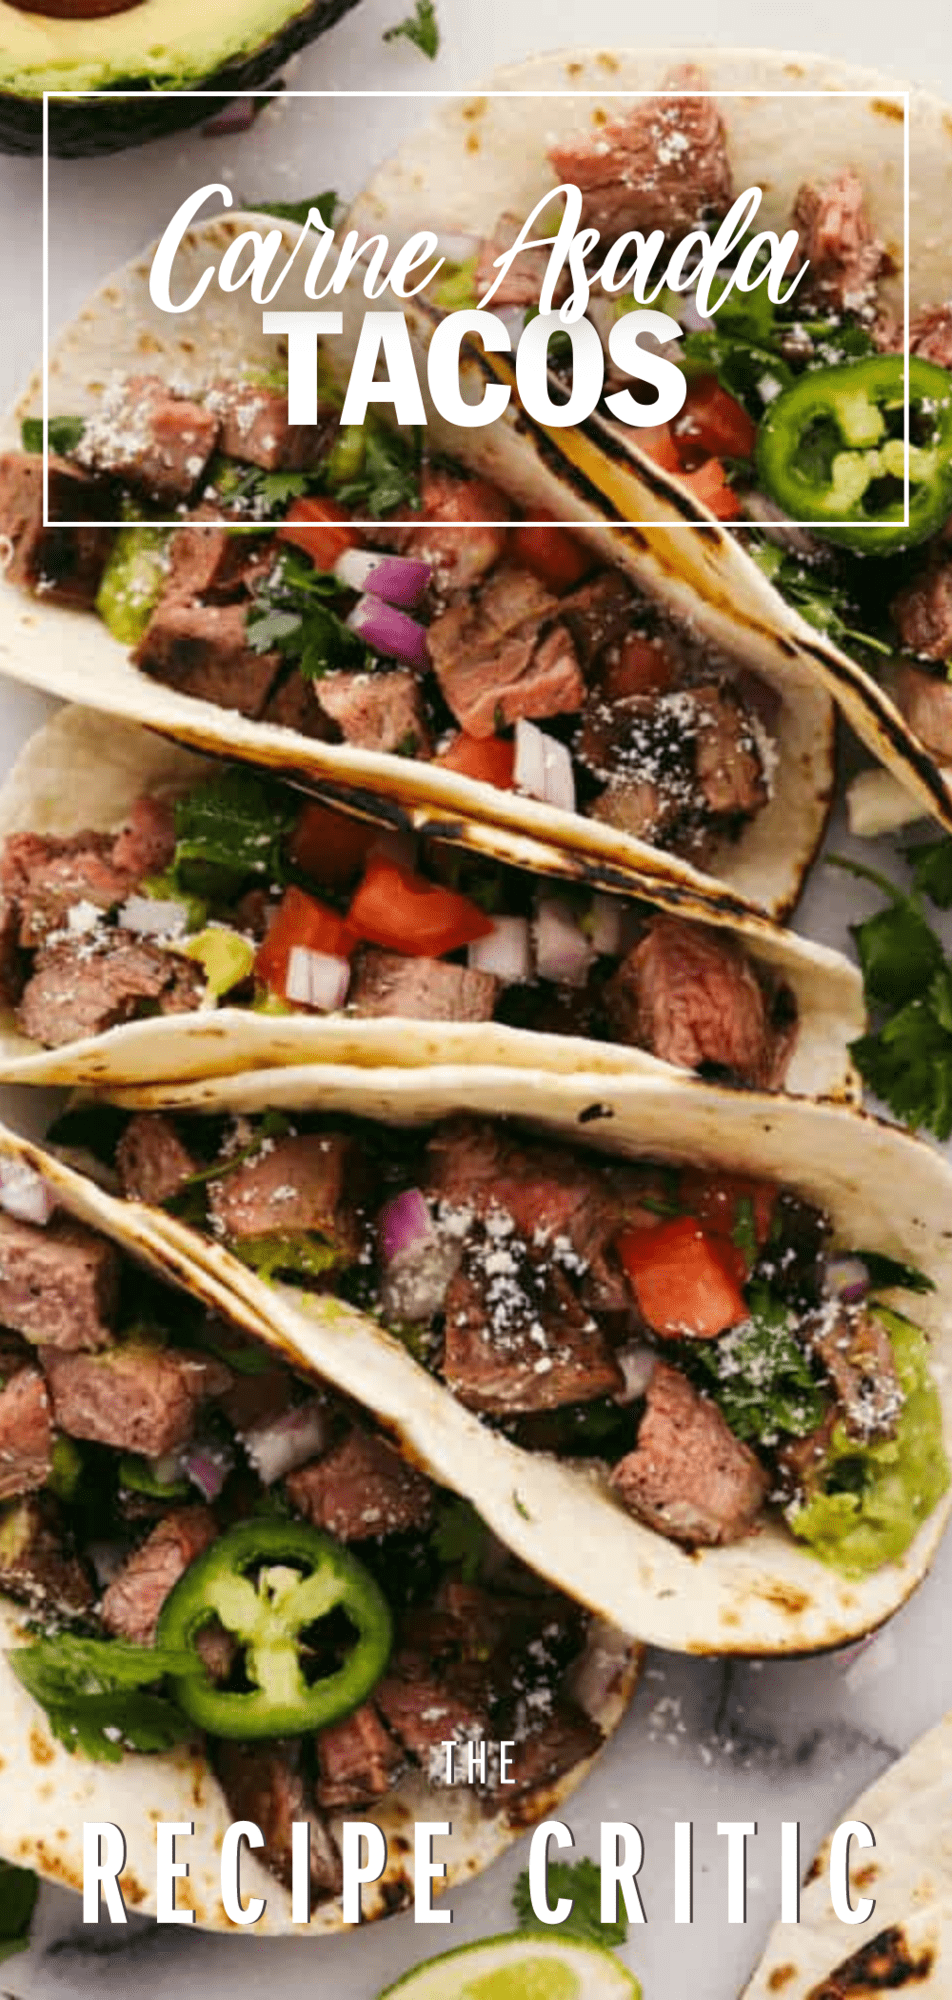
Carne Asada Tacos | The Recipe Critic

Posted: 30 May 2022 05:22 AM PDT

This website may contain affiliate links and advertising so that we can provide recipes to you. Read my privacy policy.

Carne asada tacos are a go-to recipe in our family! You can fill the tortilla to the brim with all of your favorite toppings, and everyone (even picky eaters!) will go crazy over this meal!

Taco Tuesday is the best, and these tacos are perfect for it! Pair these with Mexican rice, homemade guacamole, and these delicious air fryer tortilla chips.

The top view of assembled carne asada tacos.

The Best Carne Asada Tacos

So this recipe tells you how to form and create the best carne asada tacos out there! But before you start into that, you need to make your carne asada and you could even make your tortillas from scratch too! This carne asada is absolutely divine. It's tender and juicy and has so much flavor. You don't want to skip it or use another recipe. Trust me when I say that it's the best of the best! I know that once you eat it then you will be thanking me later.

After you've made your carne asada, then comes the fun part! The reason that my family loves these so much is because they can customize them however they want! The picky kids can eat just the meat and tortilla while the rest of us can still enjoy a delicious and very flavorful meal. Make these your own and add in any and all of the toppings that you can think of!

Ingredients in Carne Asada Tacos

This list is what I use to make these carne asada street tacos but feel free to add to it or take things away to fit your family's needs! Check out the recipe card at the bottom of the post for exact measurements.

  • Flour Tortillas: You can use flour tortillas or corn tortillas. Make them from scratch or buy them from the store, whichever you prefer!
  • Carne Asada: Grill up this recipe before hand and then chop it up into bite size pieces.  
  • Red Onion: Chop or slice this up to the size that you like.
  • Jalapeno: These are optional. Use more if you like a lot of heat!  
  • Roma Tomato: I love the fresh flavor and texture that the tomatoes bring to this.
  • Guacamole: I love a good dollop of guacamole on my tacos!
  • Sour Cream: Add in this delicious and tangy sour cream to the tacos for added texture and taste.
  • Cotija Cheese: This is a MUST for carne asada tacos! It's SO delicious!
  • Cilantro: Chop this up and sprinkle it on as a garnish.

How to Make Carne Asada Tacos

These tacos are super simple to throw together. You can make carne asada nachos, and fries and even use it as a topping on a salad! In fact, I like to cook up my carne asada and double the batch to keep some in my fridge for recipes all week long.

  1. Cook the meat: Cook the carne asada and then chop it into bite-sized pieces. 
  2. Start assembling the taco: Lay the tortilla on a flat surface. Then, add ½ cup of the carne asada to the center of the tortilla.
  3. Add toppings: Add red onion, jalapeño, tomato, guacamole, and then sour cream. Top with Cotija cheese and then chopped cilantro.
Tortillas laying flat that have toppings on them.

Additional Toppings

I've got you covered for all of you who love to load up your carne asada tacos with as many toppings as possible! Here is a list of some more toppings that you can use on these tacos. Try them out and then you can make it a different meal every time.

  • Salsa
  • Pico de Gallo
  • Bell Peppers
  • Avocado
  • Salt and Pepper
  • Fresh Lime Juice or Lime Wedges
  • Black Beans
  • Pinto Beans
  • Refried Beans (You could add these to the taco OR serve them as a side!)
  • Chili Powder (Sprinkle it on for a little bit of added heat!)

A carne asada taco folded in half and being held.


  • Cook the carne asada and chop it into bite-sized pieces.
  • Lay the tortilla on a flat surface. Add ½ cup of the carne asada to the center of the tortilla.

  • Add red onion, jalapeño, tomato, guacamole, and sour cream. Top with Cotija cheese and chopped cilantro.


Serves: 4

Calories233kcal (12%)Carbohydrates21g (7%)Protein5g (10%)Fat15g (23%)Saturated Fat6g (30%)Polyunsaturated Fat2gMonounsaturated Fat5gCholesterol25mg (8%)Sodium341mg (14%)Potassium302mg (9%)Fiber4g (16%)Sugar3g (3%)Vitamin A499IU (10%)Vitamin C11mg (13%)Calcium129mg (13%)Iron1mg (6%)

All nutritional information is based on third party calculations and is only an estimate. Each recipe and nutritional value will vary depending on the brands you use, measuring methods and portion sizes per household.

Course Dinner

Cuisine Mexican

Keyword Carne Asada Tacos, tacos

The post Carne Asada Tacos | The Recipe Critic first appeared on Low Calorie Ideas.

The post Carne Asada Tacos | The Recipe Critic appeared first on Low Calorie Ideas.

Low Calorie Ideas.com Newsletter

Low Calorie Ideas.com Newsletter

Link to Low Calorie Ideas

Easy Baked Chicken Breasts (Juicy, Flavorful!)

Posted: 28 May 2022 05:13 AM PDT

Plate with sliced baked chicken breast and cucumber salad

A fail-proof recipe for juicy, tender, flavorful chicken breasts? This is it! We tinkered with a few variations before landing on this perfected version. It's easy, reliable, umami-filled, and pairs well with just about anything!

Try it with bowls, salads, pasta, and beyond! Bonus points? It requires just 5 ingredients and they're all pantry staples you probably have around. Let us show you how it's done!

Chicken breasts, olive oil, coconut aminos, maple syrup, and lemons

How to Bake Chicken Breasts

If you're looking to bake chicken breasts that are juicy and flavorful, we have a few secrets to share with you:

  • Marinate – to infuse flavor
  • Sear on the stovetop – to lock in moisture
  • Bake to an internal temperature of 165 Fahrenheit – to ensure food safety and avoid under/overcooking
  • Rest – this minimizes the amount of juices that spill out when cutting

We start this quick and easy recipe with a 4-ingredient marinade made with oil, coconut aminos, lemon juice, and maple syrup. It's umami-forward with a little sweetness and brightness to balance it out.

Whisking olive oil, coconut aminos, lemon juice, and maple syrup in a glass dish

Whisk the marinade ingredients, then add in the boneless skinless chicken breasts and let them marinate. After just 15 minutes (a.k.a. just the right amount of time to prep sides like salad, rice, or roasted asparagus), it's time to start cooking.

Marinating chicken breasts in a glass dish

We start the chicken breasts on the stovetop because the higher heat helps lock in moisture and creates a golden brown crust.

We then transfer to the oven, helping them cook fully through the center. An oven thermometer is your best friend for making sure it's cooked enough to ensure food safety without overcooking (which will make it dry). The leftover marinade cooks with the chicken, creating a sauce that would make even dry chicken taste good!

Slicing into a pan seared baked chicken breast

We hope you LOVE these seared baked chicken breasts. They're:

Tender
Juicy
Umami-filled
Subtly sweet
Quick & easy
Made with pantry staples
& Seriously amazing!

These chicken breasts are a super versatile protein-boost for Garlic & Herb Sweet Potato Nourish Bowls, Easy Penne Arrabbiata, and beyond! They also go well with simple sides like mashed potatoes, rice, roasted vegetables, and salad. The possibilities are endless!

More Flavorful Entrée Ideas

If you try this recipe, let us know! Leave a comment, rate it, and don't forget to tag a photo @minimalistbaker on Instagram. Cheers, friends!

Plate with sliced baked chicken breast and cucumber salad

Prep Time 20 minutes

Cook Time 15 minutes

Total Time 35 minutes

Servings 4 (~3-oz. cooked servings)

Course Entree, Main Course

Cuisine Dairy-Free, Gluten-Free, Grain-Free

Freezer Friendly 1 month

Does it keep? 3-4 Days

  • 1 Tbsp olive or avocado oil (plus more for oiling pan)
  • 2 Tbsp coconut aminos (we like Big Tree brand)
  • 1 Tbsp lemon juice
  • 1 tsp maple syrup
  • 2 (~8 oz. each) boneless skinless chicken breasts (pasture raised, organic when possible)
  • Preheat oven to 425 F (218 C).

  • In a wide and shallow bowl or dish, combine the oil, coconut aminos, lemon juice, and maple syrup. Whisk until cohesive and smooth. Place the chicken breasts in the marinade and flip them a few times to coat. Set aside to marinate for 15 minutes, flipping at the halfway point to marinate evenly.

  • Heat a large oven-safe skillet (we like cast iron or stainless steel) over medium-high heat. Add ~1 tsp oil (just enough to coat the skillet). Once the oil is hot and shimmering, add the chicken breasts to the pan. The pan should be hot enough that they sizzle nicely! Let them sear for 2-3 minutes, then flip and sear for another 2 minutes on the second side. Flip once more, turn off the heat, then pour the remaining marinade over the chicken breasts.
  • Carefully transfer the skillet to the preheated oven and bake for 10-18 minutes (flipping at the halfway point for even caramelization), or until the internal temperature of the chicken breasts reaches 165 F and they are slightly smaller in size. An oven thermometer is highly recommended as the bake time will vary based on the size of the chicken breasts (~10-12 minutes for 5-6 ounce breasts, ~12-14 minutes for 7-8 ounce breasts, and ~14-18 minutes for 8-10 ounce breasts).

  • Remove from the oven and let rest for 5-10 minutes, then slice and serve drizzled with any extra sauce from the pan.

  • Leftover chicken breasts will keep in the refrigerator for 3-4 days or in the freezer for up to 1 month. Reheat in a 350 F (176 C) oven for 10 minutes or until warmed through.

*Nutrition information is a rough estimate calculated with 8-ounce chicken breasts.

Serving: 1 (three-ounce serving) Calories: 110 Carbohydrates: 2.9 g Protein: 12.8 g Fat: 4.9 g Saturated Fat: 0.8 g Polyunsaturated Fat: 0.6 g Monounsaturated Fat: 2.9 g Trans Fat: 0 g Cholesterol: 41 mg Sodium: 161 mg Potassium: 221 mg Fiber: 0 g Sugar: 2.6 g Vitamin A: 17 IU Vitamin C: 1.7 mg Calcium: 4.7 mg Iron: 0.2 mg

The post Easy Baked Chicken Breasts (Juicy, Flavorful!) first appeared on Low Calorie Ideas.

The post Easy Baked Chicken Breasts (Juicy, Flavorful!) appeared first on Low Calorie Ideas.

Low Calorie Ideas.com Newsletter

Low Calorie Ideas.com Newsletter

Link to Low Calorie Ideas

Sausage Tortellini Soup – Spend With Pennies

Posted: 26 May 2022 05:12 AM PDT

Soup is the perfect belly-warming meal in a bowl and this sausage tortellini soup is both quick and delicious.

It's a one-pot soup packed with Italian sausage, cheese tortellini, and a handful of veggies. It comes together in no time and satisfies even the heartiest of appetites!

sausage tortellini soup in a bowl

A Favorite Tortellini Soup Recipe

  • This soup is ready in just over 30 minutes start to finish.
  • Italian sausage (hot or mild) adds great flavor but you can swap it out for your favorite ground meat.
  • This recipe is great with extra veggies including bell pepper, mushrooms, spinach, and kale.
  • Just one pot means less mess, fewer dishes, and easier clean-up.

Ingredients for Sausage tortellini soup shown with a title

Ingredients

MEAT Ground Italian sausage is used in this recipe. If you use other ground meats, you'll want to boost the seasonings a bit with Italian seasoning and some extra salt! Fennel is the spice that gives Italian sausage its flavor so add a little if you have it.

BROTH I prefer a low sodium beef broth in this recipe but chicken broth will work. A little bit of cornstarch adds great texture to the broth just thickening it very slightly.

VEGGIES Onion adds flavor (feel free to throw in a couple of cloves of garlic too). The canned tomatoes add a bit of zest and texture, if you prefer you can use crushed tomatoes (or break up some canned whole tomatoes).

TORTELLINI Italian sausage makes this soup meaty so we prefer cheese tortellini in this recipe but feel free to use your favorite. Mini ravioli works too.

Pro Tip: Adding a little bit of cornstarch to the broth doesn't thicken it but it does add a silky feel!

Variations

  • Add a splash of hot sauce or a few red pepper flakes for a touch of heat.
  • Any veggie goes from chopped carrots or bell pepper to mushrooms.
  • Add your favorite herbs like thyme, rosemary, or parsley.

sausage and tomatoes in a pot for making tortellini soup

How to Make Sausage Tortellini Soup

You'll love how easy it is to make this tasty Italian-style soup! We love that this broth-based version skips the heavy cream.

  1. In a large soup pot or dutch oven, cook sausage & onion. Break it up with a wooden spoon cooking until no pink remains. Drain grease.
  2. Add broth, tomatoes, & seasonings; simmer to blend flavors.

  1. Add tortellini & zucchini and simmer until tender.
  2. Season with salt & black pepper to taste and serve.

a large pot of sausage tortellini soup

Kitchen Tips

  • To make prep quick, while the sausage is cooking prepare the other ingredients. While the soup is simmering, slice the zucchini.
  • Leftover meats and veggies can be added. If they are already cooked add them in the last few minutes since they just need to heat through.
  • Boost the flavor of this soup by adding a parmesan cheese rind (or vegetable juice like V8) to the broth as it simmers. Discard the rind before serving.

A ladle of cooked Sausage tortellini soup in a pot

Make-Ahead & Leftovers

  • Pasta doesn't keep well in soups, it will soak up the broth and get mushy. If you plan for leftovers, cook the tortellini separately.
  • Keep tortellini soup covered in the refrigerator and it will last about 4 days.
  • Double the base of this soup (without tortellini) and freeze half for another day. Add any fresh pasta once thawed.
  • Freeze portions of soup in freezer bags, muffin tins, or a freezer container without pasta (or with the pasta on the side). Add tortellini or pasta once thawed

two bowls of Sausage tortellini soup

More Quick Soups

Did you love this Sausage Tortellini Soup? Be sure to leave a rating and a comment below! 

Sausage Tortellini Soup

This hearty soup is loaded with Italian sausage, fresh veggies, and cheese-filled tortellini!


Follow Spend with Pennies on Pinterest

  • Cook sausage and onion until no pink remains. Drain fat.

  • Combine water and cornstarch and add to the pot along with broth, diced tomatoes, and seasonings. Cook for 5 minutes.

  • Bring to a boil. Add tortellini and zucchini and reduce heat to a simmer. Cook 6-7 minutes or until tortellini is tender. Season with salt & pepper to taste.

  • Top with fresh parsley and parmesan cheese for serving.

Note: If you plan to keep leftovers, cook the tortellini separately and add to each bowl while serving.
This recipe is great with extra veggies including bell pepper, mushrooms, spinach, and kale. A can of white beans can be added too.

Serving: 1.33cups, Calories: 226, Carbohydrates: 14g, Protein: 12g, Fat: 14g, Saturated Fat: 5g, Cholesterol: 36mg, Sodium: 752mg, Potassium: 654mg, Fiber: 2g, Sugar: 4g, Vitamin A: 145IU, Vitamin C: 14mg, Calcium: 67mg, Iron: 2mg

(Nutrition information provided is an estimate and will vary based on cooking methods and brands of ingredients used.)

Course Dinner, Lunch, Side Dish, Soup

Cuisine American, Italian

bowls of Sausage Tortellini Soup with a title
close up of plated Sausage Tortellini Soup with writing
adding Sausage Tortellini Soup ingredients to pot with writing
ingredients in a pot to make Sausage Tortellini Soup with final dish and writing

The post Sausage Tortellini Soup – Spend With Pennies first appeared on Low Calorie Ideas.

The post Sausage Tortellini Soup – Spend With Pennies appeared first on Low Calorie Ideas.